This is the first in a series of photographic tips and techniques for you try, including picture taking techniques, Photoshop and Sagelight.
Do you remember taking a slide film and processing it in C-41 or a negative film and processing it in E-6? And all those strange colours and contrasts you used to get? Well this is the first of our techniques that emulates this cross processing effect in Photoshop.


Before


Do you remember taking a slide film and processing it in C-41 or a negative film and processing it in E-6? And all those strange colours and contrasts you used to get? Well this is the first of our techniques that emulates this cross processing effect in Photoshop.
STEP 1
Open the image of your choice in Photoshop then click the "Layer/ new adjustment layer" in the top menu and select ‘Curves’. From the Channel drop-down box, select the Red channel and drag the curves so it looks like the image below.
Open the image of your choice in Photoshop then click the "Layer/ new adjustment layer" in the top menu and select ‘Curves’. From the Channel drop-down box, select the Red channel and drag the curves so it looks like the image below.

STEP 2
Select the Blue channel and drag the curves so it looks like this image. It doesn't need to be much — just enough to take some blue out of the highlights.
Select the Blue channel and drag the curves so it looks like this image. It doesn't need to be much — just enough to take some blue out of the highlights.

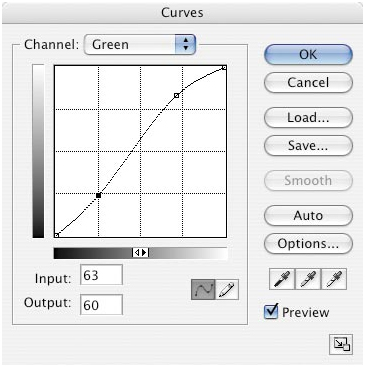
STEP 3
In the Green channel, add another gentle ‘S’ curve — increasing the contrast, especially in the highlights.

In the Green channel, add another gentle ‘S’ curve — increasing the contrast, especially in the highlights.
STEP 4
Fine-tune each individual channel curve to suit your image, but leave the combined RGB curve untouched. Focus on the colour balance rather than the contrast.

Fine-tune each individual channel curve to suit your image, but leave the combined RGB curve untouched. Focus on the colour balance rather than the contrast.

STEP 5
One final step is to add a yellow colour cast to the picture. Click the "Layer/Create new fill" and choose Solid Colour. Select a yellow-green and click OK, then reduce the new layer's opacity to just 10%
One final step is to add a yellow colour cast to the picture. Click the "Layer/Create new fill" and choose Solid Colour. Select a yellow-green and click OK, then reduce the new layer's opacity to just 10%

And that’s it! A simple way of producing a crossed processed effect. Great for portraiture and fashion shoots.
Before

After

Is anyone using AOL having trouble posting a comment?
ReplyDeleteNew format - does this help?
ReplyDeleteI use aol and hopefully this has made it but still no pictures???
ReplyDeleteLesley
Much better!!!!!!
ReplyDelete